
iPhone Portrait Mode: Complete Guide to Depth, Lighting, and Stunning Portraits in 2026
iPhone Portrait mode turns an ordinary photo of a person, a pet, or a favourite object into a picture that looks as if it was taken with a professional camera. It keeps your subject sharp, gently blurs the background, and adds soft, flattering light to the face. On iOS 26, and on the iPhone 16 and iPhone 17 families, Portrait mode is faster and easier to fix after you press the shutter than ever before. You can change the focus point, change the amount of blur, and change the lighting style long after the moment has passed, so a missed focus point no longer means a missed photo.
TL;DR: iPhone Portrait mode creates a depth map, keeps the subject sharp, and blurs the background. Open Camera, choose Portrait, tap your subject to focus, pick a focal length such as 1x, 2x, or 5x, and shoot. Afterwards, open the photo in Photos, tap Edit, and use Depth Control to change blur from f/1.4 to f/16, tap a different part of the image to move focus, and try Portrait Lighting styles such as Natural Light, Studio Light, and Contour Light. Use 2x or 3x for faces, keep the background simple and at least a metre behind the subject, and shoot in good light for the cleanest edges.
What Is iPhone Portrait Mode?
iPhone Portrait mode is a camera mode that simulates the shallow depth of field produced by a large camera lens. In a normal photo, most of the scene is in focus. In a Portrait photo, the iPhone identifies the main subject, keeps that subject sharp, and applies a graduated blur, called bokeh, to everything behind it. The result is clear separation between the person and the background, so the viewer looks straight at the face, the eyes, or the product in the frame. That separation is why Portrait mode is the default choice for headshots, birthday photos, pet portraits, food photography, and product shots on a phone.
The effect is not a simple blur filter pasted over the background. The iPhone builds a depth map, a detailed measurement of how far away each part of the scene is from the camera. It uses the cameras, the LiDAR scanner on Pro models, machine learning, and the TrueDepth camera on the front to work out the shape of a face, the outline of hair, the edge of glasses, and the gap between a person and a wall. It then blurs the background in proportion to distance, so a tree two metres behind the subject is only slightly soft, while a building twenty metres away becomes a smooth wash of colour. That distance-based blur is what makes a good Portrait photo look natural instead of cut out.
How iPhone Portrait Mode Works in iOS 26
When you open Portrait mode in iOS 26, the Camera app shows a live preview with the depth effect already applied. A yellow box appears around the detected face or subject, the word Portrait appears, and the Depth control, shown as a small f-number such as f/2.8, sits near the shutter button. The camera measures depth many times per second, so you can move the phone, move closer, or ask the subject to turn slightly, and the preview updates at once. The redesigned Camera app in iOS 26 keeps these controls close to your thumb,.
Three systems work together every time you take a Portrait photo. First, the main camera and the ultra-wide or telephoto camera capture slightly different views, and the iPhone compares them to estimate distance. Second, the LiDAR scanner on iPhone 16 Pro, iPhone 16 Pro Max, iPhone 17 Pro, and iPhone 17 Pro Max fires invisible pulses of light and times their return, giving an accurate depth map even in dim rooms. Third, the Neural Engine, the machine-learning processor inside the A18, A18 Pro, and A19 Pro chips, recognises faces, hair, fur, glasses, and hands, and refines the edge of the depth map so the blur follows the subject instead of cutting across it.
Which iPhones Support Portrait Mode?
Portrait mode is available on iPhone 7 Plus and every newer dual-camera or triple-camera iPhone, but the experience is very different on recent models. The iPhone 16, iPhone 16 Plus, iPhone 16 Pro, and iPhone 16 Pro Max, and the whole iPhone 17 family, support Portrait mode on the front and rear cameras, automatic depth capture in Photo mode, Portrait Lighting, Depth Control, and Focus and Depth editing in Photos. Older models, such as iPhone 11, iPhone 12, and iPhone 13, support the basic effect, but they lack the newest focal-length choices and some low-light improvements from the A18 and A19 Pro chips.
The iPhone 17 brings a 48-megapixel Fusion main camera, a 48-megapixel ultra-wide camera, and a new 18-megapixel Centre Stage front camera, which together make Portrait selfies and rear-camera portraits sharper than on earlier base models. The iPhone 17 Pro and iPhone 17 Pro Max add a 48-megapixel telephoto camera with 4x optical zoom and 8x optical-quality zoom, a LiDAR scanner, and the A19 Pro chip, the strongest combination for Portrait photography in 2026. The iPhone 16 family remains excellent too, with a 48-megapixel Fusion camera, 2x optical-quality zoom, and, on Pro models, a 5x telephoto camera that flatters faces. If you choose a phone mainly for portraits, Pro models are worth the extra cost, because the longer telephoto lens and LiDAR both improve the result.
How to Take a Portrait Photo on iPhone: Step by Step
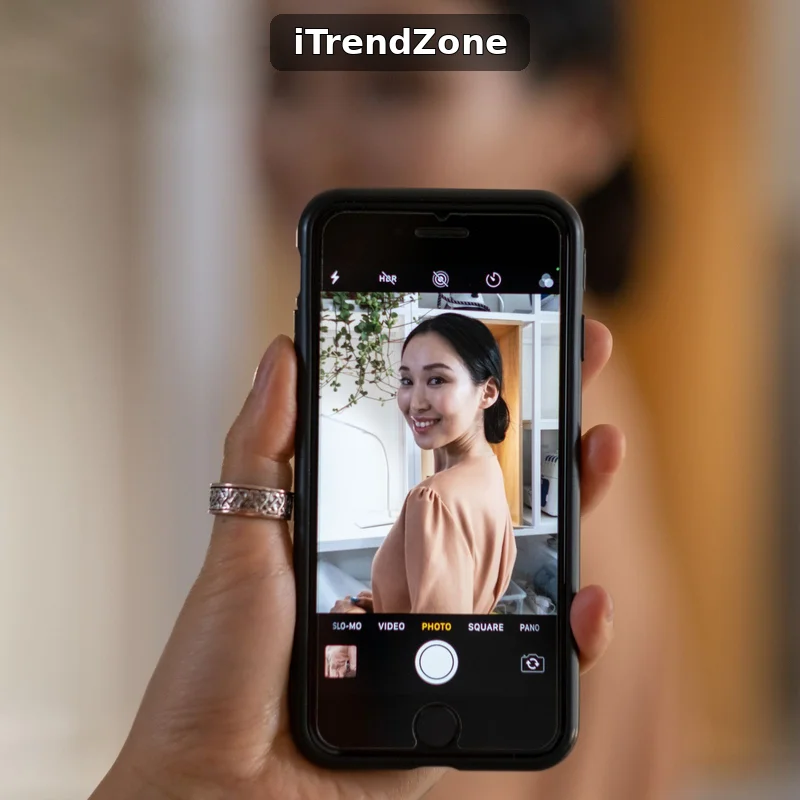
Start with the simplest method, then add one new control at a time. Open Camera, swipe the mode strip to Portrait, and point the camera at your subject. Wait a second for the yellow focus box to appear. If the camera does not detect a face, tap the subject on the screen to set focus and exposure there. Move closer or farther away until the subject fills a good part of the frame, with a little space above the head. Take the photo with the shutter button, a volume button, or the Camera Control button on iPhone 16 and iPhone 17 models.
Distance matters more than any setting. Portrait mode works best when the subject is between 0.5 metres and 2.5 metres from the camera, roughly two to eight feet. Closer than that, the camera may refuse the effect, or the face may look distorted by the wide lens. Farther than that, the depth map becomes less precise and the blur looks weaker. The background should be at least one metre behind the subject, ideally two metres or more, because blur is created by distance. A person standing against a wall gets almost no blur, while the same person two metres in front of the wall gets a soft, pleasing background.
Keep the phone steady and level. Hold the iPhone with both hands, tuck your elbows against your body, and breathe out gently as you press the shutter. Turn on the grid in Settings, then Camera, then Grid, and place the eyes on one of the upper grid lines. That small habit improves composition in every photo, not just portraits. If your hands shake, lean against a wall or use a small tripod. On iPhone 16 and iPhone 17 models, the Camera Control button gives a steadier grip, because you do not need to reach across the screen. Our guide to the iPhone camera settings explains the grid, formats, and other settings that support better portraits.
Using the Focus and Depth Button While Shooting
In Portrait mode, the Focus and Depth button, shown as a small f-number in a circle, is your most important control before you shoot. Tap it to open the depth slider, then drag left or right to change the aperture value. A low number, such as f/1.4 or f/2.0, gives a very strong blur and a dreamy background. A high number, such as f/8 or f/16, gives a light blur that keeps the background recognisable. The preview updates live, so you can see the effect before you take the photo. Start at f/2.8 for one person, f/4 for two people side by side, and f/5.6 or higher for a group, because a stronger blur can soften a person standing slightly behind the main subject.
You can also tap anywhere in the preview to move the focus point. Tap the eyes for a headshot, the nearest person for a group, or a pet’s face for an animal portrait. The camera refocuses, re-measures depth, and updates the blur around the new point. If you tap and hold, focus and exposure lock, which is useful when you want to recompose without the camera refocusing on the background. A small sun icon appears next to the focus box; drag it up to brighten the photo or down to darken it. This exposure adjustment is often the difference between a flat portrait and a rich one, especially in bright or dark scenes.
Portrait Focal Lengths: 1x, 2x, 3x, and 5x Explained
Focal length changes the look of a portrait more than most beginners expect. A wide lens, such as 1x at 24 millimetres, includes a lot of background and can make a nose look larger and a face look wider when you stand close. A longer lens, such as 2x at 48 millimetres or 3x at 77 millimetres, compresses the features, flatters the face, and blurs the background more strongly. That is why professional portrait photographers use 85-millimetre and 105-millimetre lenses, and why the iPhone’s longer Portrait options look so good for headshots.
On iPhone 16 and iPhone 17 models, the Portrait focal-length choices depend on the model. The base iPhone 17 and iPhone 16 offer 1x at 24 millimetres and 2x at 48 millimetres, using the main camera and its high-resolution sensor. The iPhone 16 Pro and iPhone 16 Pro Max add 5x at 120 millimetres on the telephoto camera, excellent for head-and-shoulders portraits from a comfortable distance. The iPhone 17 Pro and iPhone 17 Pro Max offer 1x, 2x, 4x at 100 millimetres, and 8x optical-quality zoom at 200 millimetres, the most flexible Portrait range of any iPhone. Tap the 1x, 2x, or 5x button to switch, and watch how framing and background compression change.
Use 1x when you want an environmental portrait, a photo that shows the person and the place together, such as a traveller in front of a landmark, a chef in a kitchen, or a child in a playground. Stand a little farther back, keep the background interesting but not busy, and let the blur soften the scene without removing it. Use 2x for a classic half-body portrait, a couple together, or a pet on a sofa. It is the most versatile Portrait focal length, because it flatters faces, keeps a natural sense of space, and works well indoors. Use 3x or 5x for a tight headshot, a detail portrait, or a photo taken across a room where you cannot move closer. The longer lens needs more light and a steadier hand, so brace the phone and shoot in good light.
Portrait Lighting: Natural, Studio, Contour, Stage, and More
Portrait Lighting is a set of lighting styles that the iPhone applies to the face and body in a Portrait photo. Choose a style before you shoot, by swiping the lighting icons above the shutter button, or after you shoot, by editing the photo in Photos. Each style changes the light on the subject without changing the background blur, giving a studio-like result without studio equipment. The styles are most visible on a face in soft light, and least visible in very dark or very bright scenes.
Natural Light is the default style. It keeps the lighting as the camera saw it, with no extra effect, and it is the safest choice for everyday photos, outdoor portraits, and photos you plan to edit later. Studio Light brightens the face evenly, smooths shadows, and gives a clean, professional headshot look. It works well for LinkedIn photos, school portraits, and product shots where you want the subject bright and clear. Contour Light adds gentle shadows to the cheekbones and jawline, giving the face more shape and depth. It is flattering for adults and dramatic portraits, but it can look harsh on very young children.
Depth Control: How to Change Blur After You Take the Photo
Depth Control is the slider that changes the aperture value of a Portrait photo after it was taken. Open the photo in Photos, tap Edit, then tap the Portrait icon or the Depth control. A slider appears with f-numbers from f/1.4 to f/16. Drag left for more blur, or right for less blur. The change is live, so you can stop at the exact point where the background is soft but the subject still stands out. Tap Done to save, or tap Revert to return to the original.
The f-number scale is borrowed from real camera lenses. A low f-number means a wide lens opening, a shallow depth of field, and a strong blur. A high f-number means a narrow opening, a deep depth of field, and a weak blur. On an iPhone, the scale is simulated, but the visual result follows the same rule. The most useful values are f/2.0 to f/4.0. Below f/2.0, the blur can look artificial, and small errors in the depth map become obvious around hair and glasses. Above f/8, the blur is so light that the photo starts to look like a normal photo, which defeats the purpose of Portrait mode.
Depth Control also lets you move the focus point after the photo was taken. In Edit, tap a different part of the photo, such as the second person in a group, a pet in the foreground, or a flower in front of a person. The iPhone re-renders the blur around the new focus point, keeping that part sharp and blurring the rest. This is one of the most powerful features in iPhone photography, because it turns one photo into several different photos. Take one group portrait, then create a version focused on each person. Take one photo of a dog and a child together, then create a version focused on the dog and a version focused on the child.
iPhone Portrait Mode Chart: How Aperture Changes Background Blur
The chart below shows how the simulated aperture value in iPhone Portrait mode changes the strength of background blur. The data are presented as a relative blur index, where 100 is the strongest blur at f/1.4, and 0 is no blur at all. The figures reflect how the iPhone renders depth in iOS 26: a lower f-number produces a wider simulated lens opening, a shallower depth of field, and a stronger blur, while a higher f-number produces the opposite result.
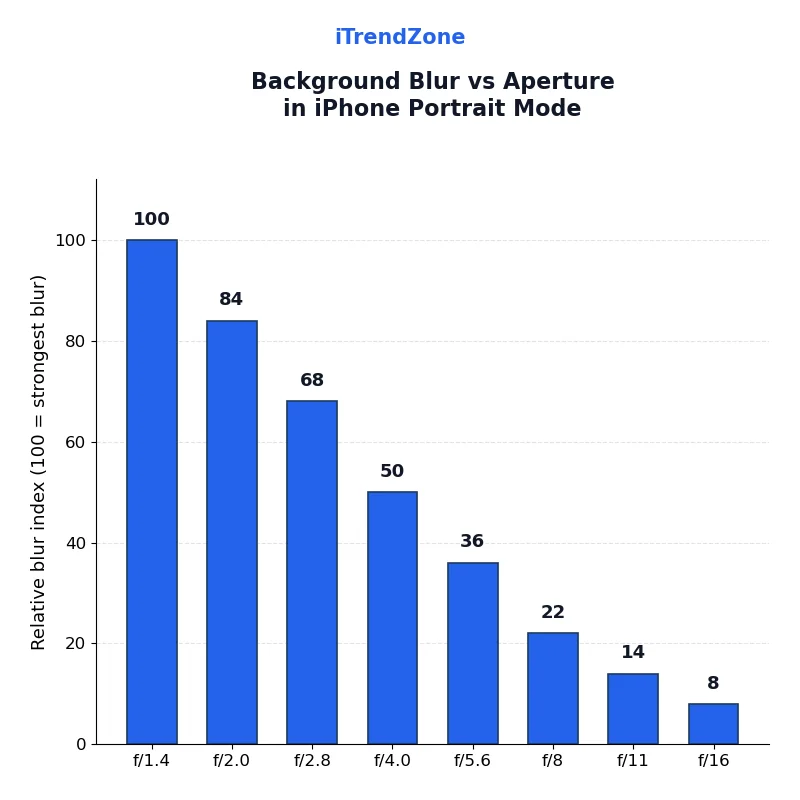
At f/1.4, the relative blur index is 100, the strongest blur available. The background becomes a smooth wash of colour, and even nearby objects lose detail. At f/2.0, the index is 84, still very strong, but the subject edges are usually cleaner. At f/2.8, the index is 68, the sweet spot for a single portrait: the background is clearly soft, yet trees, lights, and buildings remain faintly visible. At f/4.0, the index is 50, a medium blur that works well for two people or a person with a pet. At f/5.6, the index is 36, a gentle blur that keeps the setting recognisable. At f/8, the index is 22, a light blur that suits group photos and environmental portraits. At f/11, the index is 14, and at f/16, the index is 8, almost a normal photo with only a hint of softness.
Editing Portrait Photos in the Photos App
The Photos app in iOS 26 is the best place to edit a Portrait photo, because it understands depth, lighting, and focus in a way most third-party apps do not. Open the photo, tap Edit, and you will see tools for exposure, brilliance, highlights, shadows, contrast, brightness, saturation, and warmth, plus Portrait controls for Depth, Focus, and Portrait Lighting. Start with the Portrait controls, then move to general adjustments, then crop. That order matters: if you change blur or focus first, you can judge brightness and colour against the final look, rather than editing a photo that will change again.
Turning a Normal Photo into a Portrait Photo
On iPhone 15, iPhone 16, and iPhone 17 models running iOS 26, the iPhone captures depth automatically when it detects a person, a dog, or a cat in Photo mode. Open such a photo in Photos, and you will see a small Portrait icon or a banner saying Portrait effect available. Tap it, then tap Edit to adjust Depth, Focus, and Portrait Lighting, exactly as for a photo taken in Portrait mode. This is a safety net, not a replacement for Portrait mode, because the depth map captured in Photo mode can be less detailed than one captured in Portrait mode, especially in low light or with a busy background.
Portrait Mode for People, Pets, and Objects
People are the easiest Portrait subject, because the iPhone is trained to recognise faces, eyes, and hair. Ask the subject to stand still, look toward the camera, and relax their shoulders. A slight turn of the body, with the face turned back toward the camera, is more flattering than a straight-on pose. For children, get down to their eye level instead of shooting down at them. For a couple, place them close together, with one person slightly in front of the other, and focus on the nearer face. For a group of three or more, arrange them in a shallow arc, with all faces at a similar distance from the camera, and use f/5.6 or higher so everyone stays sharp.
Common Portrait Mode Problems and How to Fix Them
The most common problem is a Portrait photo where the background is not blurred at all. This usually means the subject was too close to the background, too far from the camera, or the iPhone did not detect a subject. Move the subject away from the wall, move closer to the subject, tap the subject to focus, and try again. If the problem continues, check that you are in Portrait mode, not Photo mode, and that the Portrait effect is enabled in Photos. Restarting the Camera app by swiping it away and reopening it also fixes a temporary detection failure.
Portrait Mode Settings Worth Changing in iOS 26
A few settings in iOS 26 make Portrait mode faster and more reliable. In Settings, then Camera, turn on Grid, so you can compose portraits with the rule of thirds. Turn on Mirror Front Camera if you want selfies to match what you saw in the preview, or leave it off if you prefer the standard result. In Settings, then Camera, then Preserve Settings, turn on Camera Mode, so Camera remembers you were in Portrait mode and opens there next time. Photonic Engine and Smart HDR are on by default on iPhone 16 and iPhone 17 models, and they improve Portrait photos by combining multiple exposures into one image with better detail in bright and dark areas. Leave them on unless you have a specific reason to turn them off.
| Setting | Where to Find It | What It Does | Recommended Value |
|---|---|---|---|
| Depth Control | Portrait mode, f-number button, or Photos, Edit | Changes background blur from f/1.4 to f/16 | f/2.8 for one person, f/5.6 for a group |
| Portrait Lighting | Portrait mode, lighting icons, or Photos, Edit | Changes light on the face, such as Studio or Contour | Natural Light daily, Studio Light for headshots |
| Focal length | Portrait mode, 1x, 2x, 4x, or 5x button | Changes framing and face compression | 2x for most portraits, 5x for tight headshots |
| Grid | Settings, Camera, Grid | Shows rule-of-thirds lines for composition | On |
| Preserve Camera Mode | Settings, Camera, Preserve Settings | Reopens Camera in Portrait mode next time | On, if you shoot portraits often |
| Photographic Style | Settings, Camera, Photographic Styles | Sets tone and warmth for all photos | Standard, or Warm for skin tones |
Pro Tips for Better iPhone Portraits in 2026
The best Portrait photographers think about the background before they think about the camera. Look behind the subject before you shoot. Remove a bright bin, a distracting sign, or a tree that appears to grow out of the subject’s head. Move a step left or right to place a clean wall, a soft hedge, or a distant street behind the person. A simple background makes the blur look smooth and the subject look sharp, while a busy background makes even a perfect depth map look messy. If you cannot change the background, move closer and use a longer focal length, which narrows the field of view and crops out clutter.
Portrait mode also pairs well with other iPhone camera modes and with Shortcuts. Use Photo mode for landscapes and action, Night mode for dark scenes, and Cinematic Mode for video with a blurred background, the video equivalent of Portrait mode. For a complete product story, pair a Portrait photo with a short video in iPhone Cinematic Mode. You can also create a shortcut that opens Camera directly in Portrait mode, as shown in our guide to iPhone Shortcuts for Photos and Camera and the iPhone Shortcuts Complete Guide. For the full camera system, start with our iPhone Camera Complete Guide, which links every mode in this set together.

References
Apple’s official guide to taking and editing photos on iPhone explains Portrait mode, Depth Control, and Portrait Lighting in detail. Apple’s iPhone 17 page describes the 48-megapixel Fusion camera, the Centre Stage front camera, and the Portrait features of the latest base model. Apple’s iPhone 17 Pro page describes the 48-megapixel telephoto camera, the LiDAR scanner, and the A19 Pro chip. Apple’s iPhone 16 page describes the 48-megapixel Fusion camera and the Portrait features of the previous generation. These sources were checked in November 2026 and were used to confirm the camera features, focal lengths, and iOS 26 behaviour described in this guide.
Quiz: Test Your iPhone Portrait Mode Knowledge
Question 1: What does iPhone Portrait mode use to separate the subject from the background?
A) A plastic lens filter attached to the camera
B) A depth map that measures how far away each part of the scene is
C) A flash that lights only the subject
D) A cropped copy of the photo with the edges deleted
Question 2: Which aperture value gives the strongest background blur in iPhone Portrait mode?
A) f/16
B) f/8
C) f/5.6
D) f/1.4
Question 3: Which focal length is usually the most flattering choice for a classic half-body portrait?
A) 2x at 48 millimetres
B) 0.5x ultra-wide at 13 millimetres
C) 1x at 24 millimetres, shot very close to the face
D) Digital zoom at 10x in low light
Question 4: Where can you change the focus point and the blur strength after a Portrait photo was taken?
A) Only in a third-party app that you pay for
B) Only by retaking the photo in Portrait mode
C) In the Photos app, by opening the photo and tapping Edit
D) In Settings, by turning Portrait mode off and on again
Question 5: Which Portrait Lighting style brightens the face evenly for a clean headshot look?
A) Stage Light Mono
B) Studio Light
C) High-Key Light Mono
D) Natural Light, with the flash turned on
Quiz Answers: Question 1: B, Question 2: D, Question 3: A, Question 4: C, Question 5: B