
iPhone ProRAW and ProRes Guide: Shoot, Edit, and Store Like a Pro in 2026
iphone proraw is the single most powerful photo setting hiding inside your iPhone, and most owners never switch it on. It turns the Camera app from a point-and-shoot into a professional capture tool, recording far more colour, highlight, and shadow detail than a standard photo, while ProRes does the same job for video. If you own an iPhone 16 Pro, iPhone 16 Pro Max, iPhone 17 Pro, or iPhone 17 Pro Max running iOS 26, you already carry a camera that can shoot 48-megapixel RAW stills and cinema-grade video, yet the default settings deliberately keep those formats switched off to save storage space and keep everyday photos small and shareable. This guide explains exactly when that trade-off is worth making, how to enable both formats in under a minute, how much storage they really use, how to record ProRes directly to an external SSD, and how to edit the results without ruining them. You will learn the difference between ProRAW and ProRAW Max, between ProRes, ProRes Log, and standard video, and the simple workflow professionals use to get the best image quality from an iPhone without filling the phone in a single afternoon.
TL;DR: Turn on ProRAW in Settings, then tap RAW in the Camera app when a photo matters, and turn on ProRes in the same menu when a video matters. Use 48MP ProRAW Max for landscapes, prints, and heavy edits, 12MP ProRAW for everyday editing, and ProRes Log for colour grading. Expect roughly 25 MB per 12MP ProRAW photo and 75 MB per 48MP ProRAW photo, and about 6 GB per minute for 4K ProRes, so record long ProRes clips to a fast external SSD. Edit ProRAW in Photos or Lightroom, grade ProRes Log in Final Cut Pro, DaVinci Resolve, or CapCut, and keep HEIF switched on for casual shots, family snaps, and anything you will only share on social media.
What Is iPhone ProRAW?
iphone proraw is Apple’s version of the RAW photo format, built specifically for iPhone. A normal iPhone photo is saved as HEIF or JPEG, which means the phone makes almost every creative decision for you before you ever see the image. It chooses the white balance, applies noise reduction, sharpens edges, compresses tones, and throws away the extra data it thinks you will not need. The result looks excellent straight out of the camera, and it is tiny, usually between 1.5 MB and 3 MB, but it leaves you very little room to change your mind later. If you try to brighten a dark HEIF photo by two stops, or recover a blown-out sky, you quickly hit banding, noise, and flat, plasticky detail, because that information was discarded at the moment you pressed the shutter.
ProRAW keeps that information. It records the raw sensor data from the camera, together with the computational photography that makes iPhone photos so good in the first place, including Smart HDR, Deep Fusion, and Night mode processing. That combination is what makes ProRAW different from a traditional RAW file on a mirrorless camera. A conventional RAW file is unprocessed and often looks flat, dull, and noisy until you edit it. A ProRAW file looks good immediately, with sensible exposure and colour, yet it still contains 12-bit or 14-bit colour depth, a much wider dynamic range, and far more detail in highlights and shadows. You can change the white balance after the fact without a colour cast, pull back a bright sky, lift deep shadows, and apply strong local adjustments, all while the image holds together. For anyone who edits photos seriously, even occasionally, that flexibility is the whole point.
ProRAW files use the DNG format, the open digital negative standard created by Adobe. That matters because DNG files open in almost every serious photo editor, including Apple Photos, Adobe Lightroom, Capture One, Affinity Photo, and Photoshop. You do not need a special Apple-only app to use them. When you share a ProRAW photo to an app that does not understand DNG, iOS usually converts it to a JPEG or HEIF automatically, so sharing still works, but you lose the editing headroom. Keep the original DNG for editing, and export a JPEG or HEIF copy for sharing. That two-file habit is the simplest way to enjoy ProRAW without confusing your photo library.
What Is ProRes Video?
ProRes is Apple’s professional video codec, the same family of codecs used in film and television post-production. Where ProRAW is about still photos, ProRes is about moving images. Standard iPhone video is recorded in HEVC, also known as H.265, which is extremely efficient. It squeezes an hour of 4K video into a relatively small file by throwing away information between frames and relying on clever prediction. That is perfect for sharing, streaming, and storing holiday clips, but it is a poor starting point for editing. When you colour grade HEVC footage heavily, push the shadows, or add effects, compression artefacts appear quickly: blocky gradients in skies, banding in skin tones, and mushy detail in fast motion.
ProRes solves that by recording each frame with far less compression. Every frame stands on its own, with much more colour information preserved, which makes editing, colour grading, keying, and visual effects dramatically cleaner. The footage looks almost identical to HEVC on first viewing, which surprises many people. The difference only becomes obvious when you start to grade it. A ProRes clip can be pushed two stops brighter, warmed or cooled substantially, and given a strong cinematic look without falling apart. That is why professional videographers, YouTubers, wedding filmmakers, and commercial shooters choose ProRes even though the files are enormous. If you have ever wondered why your graded iPhone video looks muddy while a professional’s looks clean, the codec is usually the reason.
ProRAW vs HEIF vs JPEG: Which Format Wins?
Choosing a photo format is really choosing what to sacrifice. HEIF sacrifices editing flexibility to gain tiny files and instant sharing. JPEG does the same, with slightly larger files and wider compatibility. ProRAW sacrifices storage space and speed to gain editing flexibility and image quality. None of them is universally best, and the right answer changes from one photo to the next. The table later in this guide summarises the differences, but the practical test is simple: if you will edit the photo for more than two minutes, shoot ProRAW. If you will share it within two minutes, shoot HEIF. If you are unsure, shoot ProRAW for the first few frames of an important scene, then switch back to HEIF for the rest. That hybrid approach gives you a safety net without filling your storage.
ProRAW Max and 48MP: The Full-Resolution Mode
Since the iPhone 14 Pro, the main camera has used a 48-megapixel sensor, but by default it combines four pixels into one, a process called pixel binning, and outputs a 12-megapixel photo. Binning improves low-light performance and reduces noise, and for most photos it is the right choice. ProRAW Max, introduced with the iPhone 14 Pro and refined on the iPhone 15 Pro, iPhone 16 Pro, and iPhone 17 Pro, unlocks the full 48-megapixel resolution. The resulting DNG file contains four times as many pixels, which means dramatically more detail when you zoom in, crop, or print large. A 48MP ProRAW file is typically 60 MB to 90 MB, with 75 MB a realistic average, compared with about 25 MB for a 12MP ProRAW file. That is a large file, but it is also a file that can be printed at A3 size, cropped to half its area and still look sharp, and edited with fine local adjustments that would smear a smaller file.
Which iPhones Support ProRAW and ProRes?
ProRAW and ProRes are Pro-model features, and that has not changed in 2026. You need an iPhone 12 Pro or later for ProRAW, and an iPhone 13 Pro or later for ProRes, with the best experience on the newest models. The iPhone 17 Pro and iPhone 17 Pro Max, launched in September 2025, offer the most capable implementation yet, with a 48MP Fusion main camera, improved ProRes recording, faster USB-C transfer, and better thermal performance for long video takes. The iPhone 16 Pro and iPhone 16 Pro Max remain excellent for both formats, and the iPhone 15 Pro and iPhone 15 Pro Max support them fully, including ProRes Log and external SSD recording. Older Pro models support the formats but with lower maximum resolutions and frame rates, and without some newer options such as 4K ProRes at 120 frames per second. Standard iPhone models, including the iPhone 16, iPhone 17, and iPhone Air, do not offer ProRAW or ProRes at all, even on iOS 26. If you are choosing a phone specifically for professional photo and video work, that distinction alone justifies the Pro model.
| Format and model | Maximum quality | Typical file size | Best for |
|---|---|---|---|
| ProRAW 12MP, iPhone 16 Pro and 17 Pro | 12MP, 12-bit DNG | About 25 MB per photo | Portraits, low light, everyday editing |
| ProRAW Max 48MP, iPhone 16 Pro and 17 Pro | 48MP, 12-bit DNG | About 75 MB per photo | Landscapes, prints, heavy crops |
| ProRes 4K 60fps, iPhone 16 Pro and 17 Pro | 4K, ProRes 422 HQ | About 6 GB per minute | Commercial video, YouTube, grading |
| ProRes Log 4K, iPhone 15 Pro and later | 4K Log, ProRes 422 | About 6 GB per minute | Cinematic colour grading |
| HEIF 48MP, iPhone 16 Pro and 17 Pro | 48MP, HEIF | About 5 to 10 MB per photo | Detail without RAW file sizes |
| HEIF 12MP, all recent iPhones | 12MP or 24MP, HEIF | About 2 MB per photo | Everyday sharing and storage |
How to Enable ProRAW on iPhone in iOS 26
Enabling ProRAW takes less than a minute, and you only need to do it once. Open Settings, scroll down and tap Camera, then tap Formats. Under Photo Capture, turn on ProRAW and Resolution Control. Resolution Control adds a small RAW control to the Camera app, so you can switch ProRAW on and off without returning to Settings. Then choose your default ProRAW resolution: 12MP for smaller files and better low-light performance, or 48MP for ProRAW Max and maximum detail. You can change this default at any time, and you can also override it per shot in the Camera app. That per-shot control is the key to using ProRAW sensibly. Leave the default at 12MP for everyday use, and switch to 48MP only when the scene deserves it.
Once the setting is on, open the Camera app and look at the top-right corner, or the top bar in landscape orientation. You should see a RAW button, sometimes labelled RAW Max when 48MP is selected. Tap it to enable ProRAW for your next shots; tap it again to turn it off. A line through the label means ProRAW is off. On iPhone 16 Pro and iPhone 17 Pro, you can also use the Camera Control button to reach capture settings quickly, which is covered in detail in our guide to the Camera Control button. If you do not see the RAW button, check that you are using the Photo mode, not Portrait or Pano, and that you are on the main 1x camera. Some modes and lenses hide the button because ProRAW is not available there, which is normal behaviour rather than a fault.
How to Enable ProRes Video on iPhone
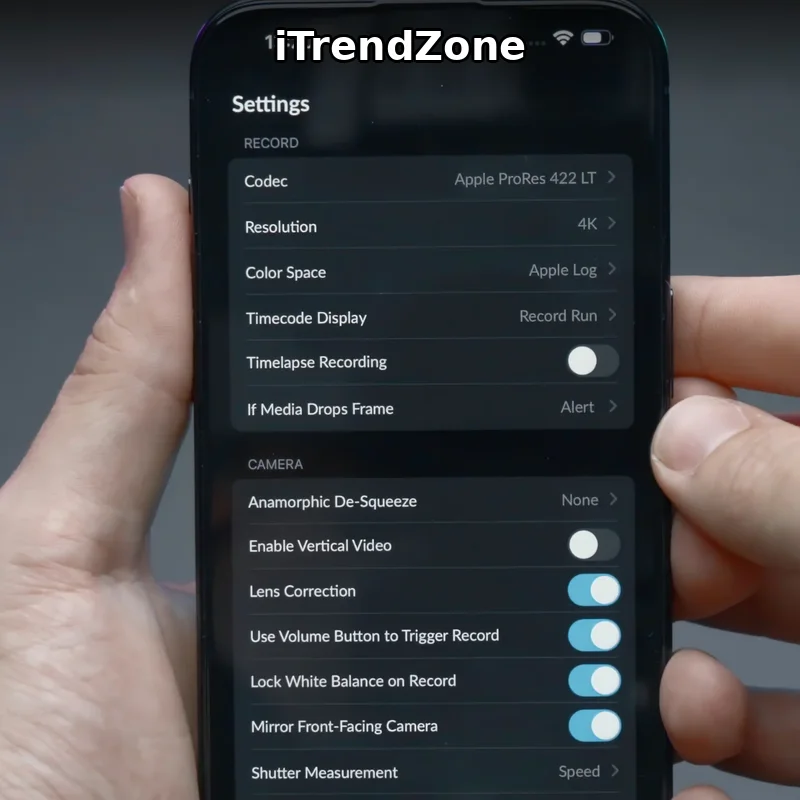
ProRes is enabled in the same Settings menu as ProRAW, which makes setup easy. Open Settings, tap Camera, tap Formats, and under Video Capture turn on ProRes. Then choose your ProRes encoding: ProRes HQ for the highest quality, ProRes 422 for a good balance, ProRes LT for smaller files, or ProRes Proxy for editing drafts. For most serious work, ProRes 422 is the sensible default, and ProRes HQ is worth choosing when the footage will be graded heavily or used commercially. Below the encoding option, turn on Log if you want ProRes Log, and choose whether Log is the default for ProRes recording. You can also enable HDR video separately, but note that Log and HDR serve different purposes and are not usually combined. Log is for grading, HDR is for direct viewing on HDR screens, so choose one workflow per project.
Back in the Camera app, switch to Video mode and look for the ProRes indicator at the top of the screen. Tap it to toggle ProRes on or off for that recording, and tap the resolution and frame-rate indicator to choose 4K at 24, 25, 30, or 60 frames per second, or 1080p for smaller files and higher frame rates. The Camera app helpfully shows how much recording time you have left at the current settings, based on your free storage. Pay attention to that number. If it says three minutes remaining and you need ten, you either need to free space or connect an external SSD before you press record. That warning has saved many shoots, and ignoring it is the most common ProRes mistake beginners make.
iPhone ProRAW File Size Chart: What ProRAW Really Costs
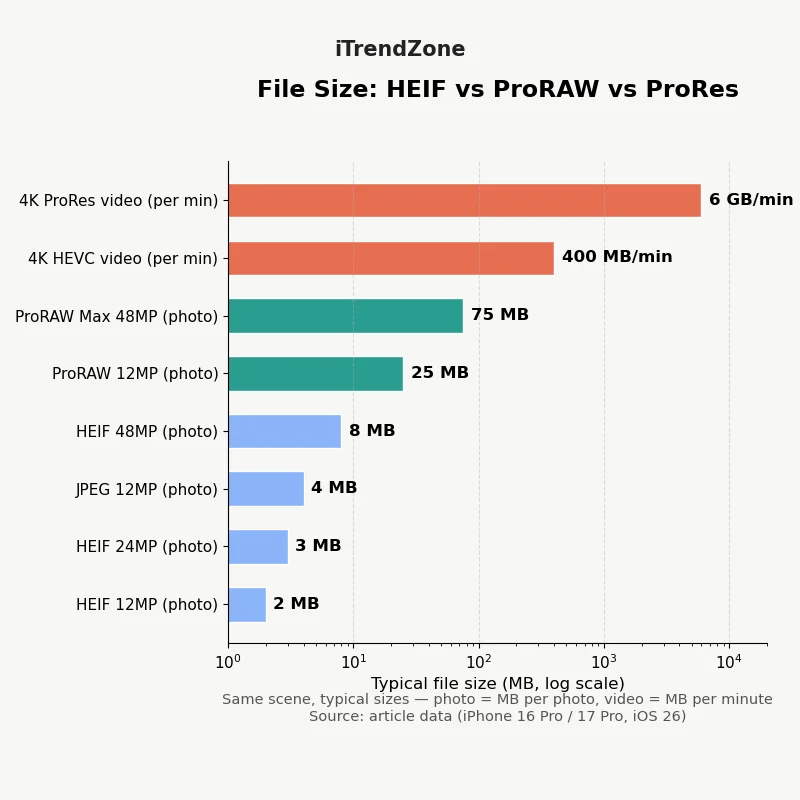
The chart below compares the typical file size of the same scene shot in six different formats, and it tells the whole ProRAW story in one picture. A 12MP HEIF photo uses about 2 MB, a 24MP HEIF photo uses about 3 MB, and a 12MP JPEG uses about 4 MB. Switch to 12MP ProRAW and the same scene jumps to about 25 MB, more than twelve times the HEIF size. Switch to 48MP HEIF and you use about 8 MB, still small. Switch to 48MP ProRAW Max and the file reaches about 75 MB, roughly thirty-seven times the size of the 12MP HEIF original. For video, the gap is even larger: one minute of 4K HEVC video uses about 400 MB, while one minute of 4K ProRes uses about 6,000 MB. The chart makes the trade-off impossible to ignore, and it also makes the decision easier. You are not paying for a slightly better photo. You are paying for a file that contains ten to thirty times more information, and that information is only valuable if you use it.
Recording ProRes to an External SSD
External SSD recording is the feature that turns ProRes from a short-clip novelty into a serious video tool. On iPhone 15 Pro and later, including iPhone 16 Pro and iPhone 17 Pro, you can connect a USB-C SSD and record ProRes video directly to the drive, bypassing the iPhone’s internal storage entirely. That means you can record 4K ProRes for an hour or more, limited only by the size of the drive and the battery, rather than by the few minutes of free space on the phone. It also means your footage is already on a drive you can plug into a computer for editing, with no transfer step in between. For wedding videographers, event shooters, interviewers, and anyone recording long takes, this is the single most important ProRes feature.
To use it, you need a USB-C SSD that supports at least USB 3 speeds, meaning 10 gigabits per second or faster, and ideally USB 3.2 Gen 2 or USB4. Slower drives, including many USB 2 flash drives and older external hard drives, will not work for 4K ProRes, and the Camera app will warn you. Format the drive as APFS or exFAT, both of which iOS supports, and connect it with a good-quality USB-C cable before you open the Camera app. When the drive is recognised, the Camera app shows the external storage as the recording destination, and the remaining-time indicator updates to reflect the drive’s free space. Press record as normal. When you finish, eject the drive safely through the Files app before unplugging it, to avoid corrupting the final file. A 1 TB SSD is a sensible starting point, giving you roughly two and a half hours of 4K ProRes, and a 2 TB drive is better for a full day of shooting.
Editing ProRAW Photos: A Simple Workflow
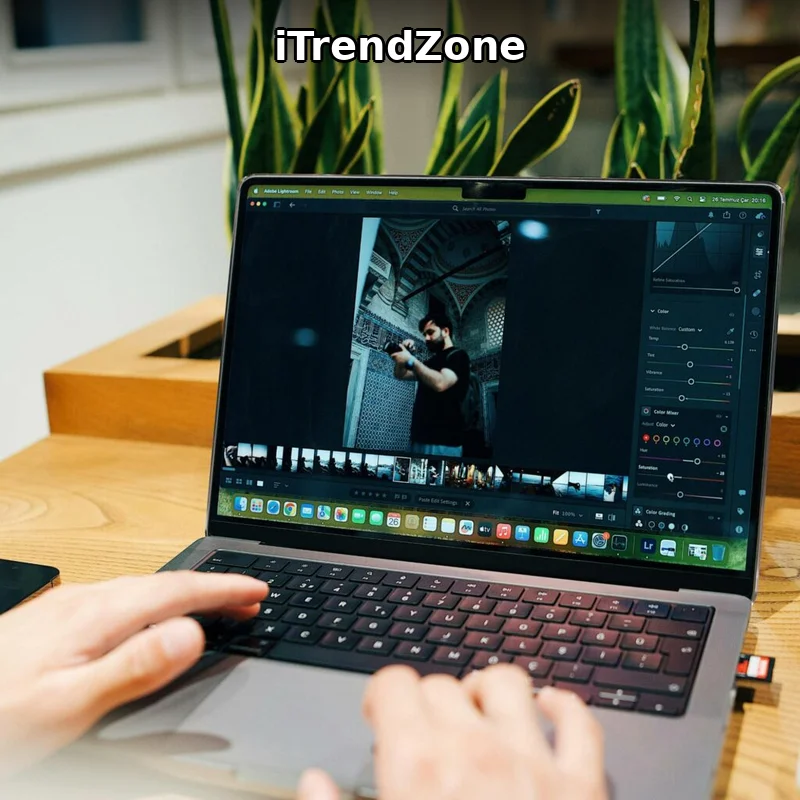
Editing ProRAW is easier than most people expect, because the file already looks good. Start in Apple Photos, which handles ProRAW natively and is more capable than many people realise. Open the photo, tap Edit, and adjust exposure, brilliance, highlights, shadows, and white balance first, because those are the adjustments where ProRAW has the biggest advantage. Pull the Highlights slider down to recover sky detail, push Shadows up to reveal detail in dark areas, and use the Warmth slider to correct white balance without introducing a colour cast. Then adjust contrast, saturation, and sharpness gently. The goal is to enhance, not to rescue, and small adjustments go a long way when the file contains this much data. When you are happy, tap Done, and Photos saves your edits non-destructively, so you can revert to the original at any time.
Editing ProRes and ProRes Log Video
ProRes footage edits smoothly in almost every professional editor, because each frame is self-contained and the computer does not need to decode complex inter-frame predictions. On a Mac, Final Cut Pro is the natural choice, with native ProRes support, excellent performance on Apple silicon, and built-in Log handling that applies the correct colour transform automatically. Import the footage, and Final Cut Pro recognises ProRes Log and offers to apply the Apple Log LUT, which instantly turns the flat, grey image into a natural-looking picture with correct contrast and colour. From there, grade with the colour wheels, curves, and colour board, and the footage will respond cleanly to large adjustments. On Windows or Mac, DaVinci Resolve offers the most powerful free colour grading tools available, with node-based grading, excellent Log support, and professional scopes, and it handles ProRes beautifully. For quick edits on iPhone or iPad, CapCut and LumaFusion both support ProRes and Log, though with fewer grading controls than a desktop editor.
When to Use ProRAW and ProRes, and When Not To
The decision framework is simple once you state it plainly. Use ProRAW when the photo is important, the light is difficult, you plan to edit, or you plan to print or crop heavily. Use ProRes when the video is important, you plan to grade or add effects, you are shooting for a client, or you need the cleanest possible image for post-production. Use HEIF and HEVC when the moment is casual, the light is easy, you will share immediately, or storage is limited. Use ProRes Log when you plan to colour grade and you understand the Log workflow. Do not use Log when you will not grade, because ungraded Log footage looks worse than standard video, not better. Do not use ProRAW for every photo, because you will run out of storage, slow down your Camera app, and spend hours editing photos that did not need editing. Do not use ProRes for a thirty-second clip of your lunch, because the file will be larger than the entire rest of your camera roll.
ProRAW, ProRes, and the Rest of the iPhone Camera
Photo editing is the other half of the ProRAW story, and our photo editing guide walks through the full editing workflow in Photos and Lightroom, including the masking and local adjustment techniques that ProRAW makes possible. If you want to automate parts of your photo workflow, such as saving ProRAW files to a specific album or converting exports, our Photos and Camera Shortcuts guide shows how to build those automations with the Shortcuts app. For a complete overview of every camera feature, start with the iPhone Camera Complete Guide, the pillar article for this series, which ties together settings, modes, and workflows. Together, these guides form a complete system: shoot in the right format, edit with the right tools, and store the results safely.
Troubleshooting ProRAW and ProRes Problems
Most ProRAW and ProRes problems have simple causes, and the fixes are quick once you know where to look. If the RAW button does not appear, you are probably in the wrong mode or using the wrong lens. Switch to Photo mode on the main 1x camera, and check that ProRAW is enabled in Settings under Camera and Formats. If ProRAW photos look flat or dull, you may be viewing the unprocessed DNG in an app that does not apply the ProRAW profile. Open the photo in Apple Photos or Lightroom, where the profile is applied correctly, and the image should look natural. If ProRAW files are larger than expected, check whether you have 48MP ProRAW Max selected instead of 12MP, and whether Live Photos is adding extra data. If the Camera app feels slow with ProRAW on, that is normal: processing a 75 MB file takes longer than processing a 2 MB file, and the delay is most noticeable in burst shooting and Night mode.
Final Tips for ProRAW and ProRes in 2026
Start small, and let your results guide you. Shoot one important scene in ProRAW this week, edit it in Photos, and compare it with the HEIF version of the same scene. Record one short clip in ProRes Log, apply a LUT, and see how much cleaner the grade looks than your usual video. Those two small tests will teach you more than any guide, because you will see the difference on your own photos and your own screen. Once you are comfortable, build the habit into your routine: check storage before a shoot, choose the right format before you press the shutter, back up after every important session, and delete the failures promptly. Professional quality on iPhone is not about using the biggest format for everything. It is about using the right format at the right moment, and that judgement, practised a few times, quickly becomes second nature. Practice on ordinary subjects first, so the settings feel automatic when the light, the moment, and the subject align together.
References
- Apple iPhone 17 Pro — Pro camera, ProRAW, and ProRes features for 2026.
- Apple iPhone 17 Pro Technical Specifications — camera, video, and USB-C details.
- Apple iPhone 16 Pro — ProRAW, ProRes, and 48MP camera features.
- Apple Developer AVFoundation Documentation — camera capture and professional video frameworks.
- Apple Developer PhotoKit Documentation — photo library, RAW, and editing support.
Quiz: Test Your iPhone ProRAW and ProRes Knowledge
Answer these five questions, then check your answers at the end of the article.
1. What is the main advantage of iphone proraw over HEIF?
- A. Smaller file sizes for sharing
- B. More editing flexibility and detail in highlights and shadows
- C. Faster burst shooting in every mode
- D. Automatic printing at large sizes
2. How large is a typical 48MP ProRAW Max photo?
- A. About 2 MB
- B. About 10 MB
- C. About 75 MB
- D. About 500 MB
3. Where do you enable ProRAW on iPhone?
- A. Settings, Camera, Formats, then ProRAW
- B. Settings, Battery, Low Power Mode
- C. Control Centre, Screen Brightness
4. Why does ProRes Log footage look flat and grey?
- A. The camera sensor is damaged
- B. The screen brightness is too low
- C. The file was recorded in HEVC
- D. Log preserves maximum dynamic range for colour grading
5. What should you use for long 4K ProRes recordings?
- A. The built-in microphone only
- B. A fast external USB-C SSD
- C. A slow USB 2 flash drive
Quiz Answers
1. B — More editing flexibility and detail in highlights and shadows. 2. C — About 75 MB. 3. A — Settings, Camera, Formats, then ProRAW. 4. D — Log preserves maximum dynamic range for colour grading. 5. B — A fast external USB-C SSD.