

iPhone Photo Editing: The Complete Guide for iOS 26 in 2026
iPhone photo editing has become a complete creative workflow that lives in your pocket. On iOS 26, with an iPhone 16 or iPhone 17, you can rescue a dark portrait, straighten a crooked horizon, remove a stranger from a beach photo, change the mood of a sunset, and export a finished image for social media, print, or a family album without opening a computer. The tools are powerful, but the difference between a natural edit and an obviously edited photo is usually a handful of small, deliberate decisions rather than one dramatic filter.
TL;DR: iPhone photo editing on iOS 26 starts in the Photos app, where Auto Enhance, crop, straighten, filters, and the Adjust sliders cover most everyday edits without changing your original. Learn Exposure, Brilliance, Highlights, Shadows, and Vibrance first, use Clean Up sparingly, choose a Photographic Style before you shoot when you can, and save ProRAW for photos you plan to print or publish. Copy edits to similar photos, add a third-party app only for a specific job, and always keep the original safe.
Why iPhone Photo Editing Matters More on iOS 26
The iPhone camera already does a great deal before you press the shutter. Computational photography balances bright skies and dark shadows, sharpens fine detail, and reduces noise in low light, so many photos look good straight out of the camera. Editing is therefore not about fixing a broken image. It is about finishing it. A small lift in exposure can reveal a face hidden in shadow, a slight crop can remove a distracting bin from the edge of a frame, and a gentle increase in warmth can make a grey afternoon feel like the golden hour you remember.
What You Need Before You Start Editing
Check three things before you edit anything important. First, confirm your iPhone is running iOS 26 and has enough free storage, because ProRAW files are large. Second, turn on iCloud Photos or make a separate backup, so a mistake never costs you an original. Apple explains how iCloud Photos keeps your library in sync in its guide to iCloud Photos on iPhone. Third, work on a copy for experimental edits. Photos is non-destructive, so you can revert at any time, but a duplicate gives extra peace of mind for a bold new look.
How the Photos App Editing Tools Work on iOS 26
To open the editor, open Photos, tap a photo, and tap Edit. You will see three main groups: Adjust, Filters, and Crop. Adjust holds the sliders for light, colour, and detail, Filters holds the built-in looks, and Crop holds rotation, straightening, perspective, and aspect ratio. At the top you will find Auto Enhance, marked with a magic wand, and a revert option that returns the photo to its original state. Learning where each tool lives is the fastest way to edit confidently.
Non-Destructive Editing: Your Original Is Always Safe
Non-destructive editing means Photos never overwrites your original file. Instead, it saves a list of your changes and applies them when you view or share the photo. You can return days or months later, change a slider, remove a filter, or tap Revert to go back to the original in one step. This is why you should feel free to experiment. Try a strong crop, test a black and white filter, or push Vibrance further than usual, because you can always undo it.
Auto Enhance: The One-Tap Starting Point
Auto Enhance is the magic wand at the top of the editor, and it is the best place to start when you are short on time. Tap it once and iOS 26 analyses the photo and adjusts exposure, contrast, saturation, and sharpness automatically. On a well-exposed daylight photo, the change is often subtle. On a dull or underexposed photo, it can be dramatic, and that is when you should look closely, because Auto Enhance can lift noise in dark areas and make skin tones look too warm.

Crop, Straighten and Fix Perspective First
Always crop before you adjust light and colour. Cropping changes what is in the frame, and therefore changes what your light and colour adjustments are working on. A bright window at the edge of a photo can fool you into darkening the whole image, but if you crop that window out first, the rest of the photo may need no exposure change at all. Start every edit by asking whether the composition is right, then fix the light, then fix the colour.
To crop, tap Crop and drag the corners or edges of the frame. You can crop freely, or choose an aspect ratio such as square for Instagram, 16:9 for a wide screen, 4:5 for a portrait post, or 3:2 for a classic print. Choose the ratio for the destination before you crop. Straightening matters too: a horizon tilted by only one or two degrees can make a landscape feel uneasy. Use the straighten slider until the horizon is level, and use perspective correction gently for tall buildings photographed from below.
Cropping for Portraits, Landscapes and Social Media
For portraits, crop close enough that the face fills a good part of the frame, but leave a little space above the head and avoid cutting through joints such as elbows or knees. For landscapes, place the horizon on the upper or lower third rather than in the middle. For social media, remember that each platform crops differently, so keep a safe margin around the subject. Our guide to iPhone camera settings explains how to shoot with the right aspect ratio in the first place, and our guide to iPhone Portrait mode shows how framing and depth work together.
Master the Adjust Sliders: Light, Colour and Detail
The Adjust sliders are where most real editing happens. The light group includes Exposure, Brilliance, Highlights, Shadows, Contrast, Brightness, Black Point, Saturation, Vibrance, Warmth, Tint, Sharpness, Definition, Noise Reduction, and Vignette. That list sounds long, but you only need a few for most photos. Start with Exposure, Brilliance, Highlights, and Shadows, then move to Vibrance and Warmth, and finish with Sharpness and Definition. If you learn those eight, you can edit almost any photo well.
Exposure controls overall brightness. Brilliance is more subtle: it brightens dark areas and adds contrast to mid-tones without blowing out bright skies, which makes it ideal for landscapes and backlit portraits. Highlights controls only the brightest parts, such as clouds and white clothing, while Shadows controls only the darkest parts, such as hair and shaded ground. Learning to balance Highlights and Shadows separately, rather than relying on Exposure alone, is the biggest step towards professional-looking edits.
Brilliance, Exposure and Highlights in Practice
Use this workflow for light. First, set Exposure so the main subject looks right. Second, pull Highlights down if the sky is blown out or clouds have lost detail. Third, lift Shadows if faces are hidden in darkness. Fourth, add a small amount of Brilliance to restore contrast in the mid-tones. Finally, compare with the original. Night photos need extra care: lift Shadows gently and avoid pushing Exposure too far, because noise becomes visible in dark areas. Our guide to iPhone Night mode explains how the camera captures more light in dark scenes.
Colour: Vibrance, Saturation, Warmth and Tint
Colour is where many edits go wrong. Vibrance is the safer choice: it boosts muted colours more than colours that are already strong, so skin tones stay natural while a dull sky gains life. Saturation boosts all colours equally, which can make skin look orange, so use it in smaller amounts. Warmth shifts the photo towards yellow when you move it up, or towards blue when you move it down. Tint shifts it towards green or magenta, and is most useful for correcting colour casts from artificial lighting. Always check skin tones when you adjust Warmth and Tint.
Sharpness, Definition and Noise Reduction
Sharpness makes edges crisper, Definition adds local contrast and makes textures such as hair and foliage stand out, and Noise Reduction smooths grain in dark photos. Use all three lightly. Too much Sharpness creates halos around edges and makes skin look harsh. Definition is powerful on landscapes and architecture, but it can emphasise wrinkles on faces. Noise Reduction is useful on night photos, but heavy use removes fine detail along with the noise. Zoom in to 100 percent on a detailed area to adjust these tools, then zoom out to judge the whole photo.
Filters and Photographic Styles: Choose a Look on Purpose
Filters in Photos are one-tap looks that change colour and tone, including Vivid, Dramatic, Mono, Silvertone, and Noir, each with a strength slider. Treat that slider as part of the filter: a filter at full strength often looks too strong, while the same filter at 40 to 60 percent can look polished and natural. Photographic Styles are different. A style such as Vibrant, Natural, Luminous, or Dramatic is applied as you shoot and changes how the camera processes tone and colour, while preserving skin tones more carefully than a simple filter.
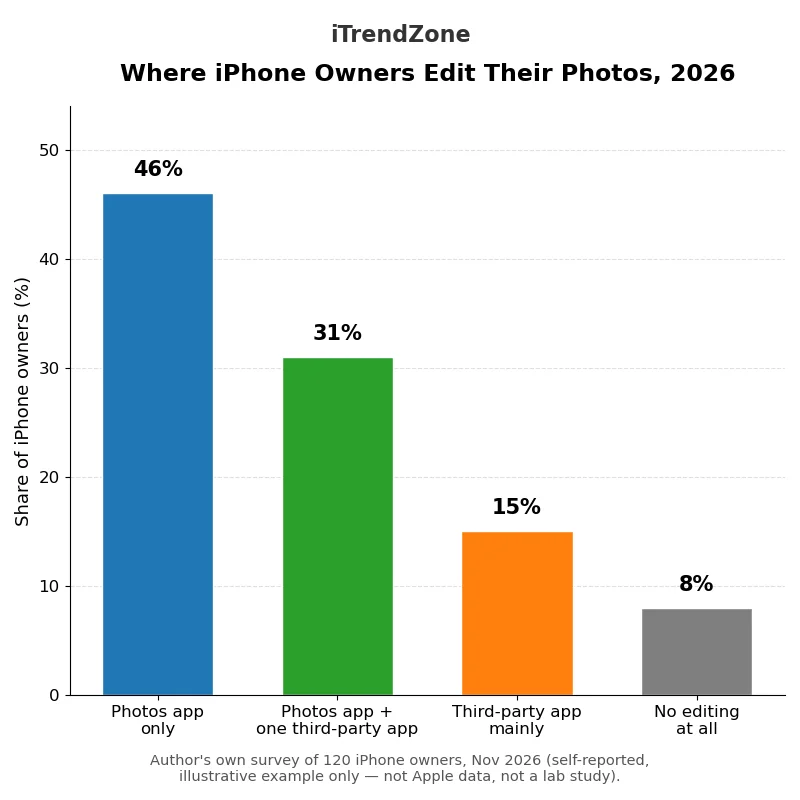
What the Latest Data Shows: iPhone Photo Editing in 2026
This section describes a chart based on a small, clearly labelled example survey by the author, not official Apple data and not a laboratory study. In November 2026, the author asked 120 iPhone owners how they usually edit their photos. The largest group, 46 percent, said they edit only in the Photos app. The next group, 31 percent, said they use the Photos app plus one third-party app. A smaller group, 15 percent, said they mainly use a third-party app, and the remaining 8 percent said they do not edit their photos at all.
Clean Up: Remove Distractions Without Leaving a Trace
Clean Up is the object removal tool in Photos on iOS 26. To use it, open a photo in Edit, tap Clean Up, and then tap, brush, or circle the object you want to remove. It works best on small, clear distractions against a simple background, such as a litter bin on a beach, a stray cable in a portrait, or a distant person in a landscape. It works less well on large objects, complex patterns, or objects that overlap the main subject, because the tool has to guess what should be behind them.
Editing Portraits, Live Photos and Cinematic Video Stills
Portrait photos have their own controls in Photos. When you open a Portrait photo in Edit, you can change the depth effect to make the background more or less blurred, and you can change the Portrait Lighting effect, such as Natural Light, Studio Light, or Contour Light. A small reduction in depth often looks more natural than maximum blur, because too much blur can make hair and glasses look cut out. Try a setting that keeps the subject sharp and the background soft, but recognisable.
Live Photos add another layer. A Live Photo is a still image with a short video and sound clip attached, and you can change its key photo, trim its length, and apply a Loop, Bounce, or Long Exposure effect. Long Exposure is useful for waterfalls and light trails. Apple explains how Live Photos work in its guide to Live Photos on iPhone, and our companion guide at iPhone Live Photos guide covers capture in more detail. Our guide to iPhone Cinematic mode video explains how to change focus after shooting video.
ProRAW and High-Resolution Editing: When Extra Data Helps
ProRAW is Apple ProRAW, a format that combines the flexibility of a RAW file with the computational processing of the iPhone camera. A ProRAW photo contains far more information about light and colour than a standard HEIC or JPEG, so you can recover detail from bright skies and dark shadows, adjust white balance more freely, and push Exposure and Shadows further without the image falling apart. The trade-off is file size: a ProRAW photo can be 25 megabytes or more, compared with 2 to 4 megabytes for a standard photo.
Use ProRAW for photos you plan to print large, publish professionally, or edit heavily, such as a wedding portrait or a landscape for a wall print. Do not use it for everyday snapshots, because the extra data will not be visible and the extra storage is wasted. Our guide to iPhone ProRAW and ProRes explains the settings and storage trade-offs. When you edit ProRAW, use the same order as a normal photo, but remember you can push the sliders further, and export as JPEG or HEIC for sharing.
Editing Tools Compared: Built-In Photos, Shortcuts and Third-Party Apps
With so many editing options, it helps to compare them side by side. The Photos app is free, fast, and non-destructive, and it covers crop, light, colour, filters, Clean Up, and Portrait controls. Shortcuts can automate repetitive edits, such as resizing a batch of photos, and our guide to iPhone Shortcuts for photos and camera shows how to build those workflows. Third-party apps add specialist tools, such as curves, masking, and AI retouching, but they cost money and sometimes save a flattened copy.
| Editing Option | Best For | Cost in 2026 | Key Strength | Main Limitation |
|---|---|---|---|---|
| Photos app on iOS 26 | Everyday edits, crop, light, colour | Free, included | Non-destructive, fast, on-device | No curves or selective masks |
| Shortcuts app | Batch resize, crop and sharing | Free, included | Automates repetitive edits | Limited fine control per photo |
| Lightroom Mobile | Advanced colour, curves, presets | Free with paid premium | Professional colour and masking | Premium features need subscription |
| Snapseed | Selective edits and healing | Free | Precise local adjustments | Interface feels dated on iOS 26 |
| Photomator | AI retouch and batch editing | Paid app or subscription | Fast AI tools, Photos integration | Paid, best on newer iPhones |
| Darkroom | Curves and film looks | Free with paid premium | Excellent curves and presets | Premium features need subscription |
Source: Author summary of editing options available on iOS 26 in November 2026, based on the apps listed on the App Store and Apple support pages; prices and features may change, so check the App Store before you buy. The Photos app remains the best starting point for most people, because it is already on your iPhone and it keeps your original safe.
Third-Party Editors Worth Trying on iOS 26
Third-party editors are worth trying when Photos cannot do a specific job. Lightroom Mobile is the most capable general editor, with curves, colour grading, masking, and presets, and it is the best choice if you want to learn professional colour editing on your phone. Snapseed is free and offers selective adjustments, where you can brighten one area without affecting the rest. Photomator is built for Apple devices, integrates closely with the Photos library, and offers fast AI tools for retouching and batch editing.
Copy, Paste and Batch Editing: Edit Once, Apply to Many
Copying and pasting edits is one of the most useful features in Photos. After you finish editing one photo, tap the three dots in the editor, choose Copy Edits, then open another photo from the same shoot, tap the three dots again, and choose Paste Edits. The second photo will receive the same crop, light, colour, and filter adjustments as the first. This works best when the photos were taken in the same light, with similar subjects, such as a series of portraits in one room.
Batch editing works less well when photos were taken in different light, because the same Exposure or Warmth setting that fixes one photo may make another worse. In that case, paste the edit and then adjust the second photo by hand. A good workflow is to edit the first photo carefully, paste it to the next three or four photos, and then check each one. Shortcuts can take batch work further, and our main guide to iPhone Shortcuts complete guide explains the foundations.
A Simple Five-Minute Editing Workflow
A reliable five-minute workflow looks like this. Minute one: crop and straighten, and remove obvious distractions with Clean Up. Minute two: fix light with Exposure, Brilliance, Highlights, and Shadows. Minute three: fix colour with Vibrance, Warmth, and Tint, checking skin tones as you go. Minute four: add a small amount of Sharpness and Definition, and reduce the strength of any filter. Minute five: compare before and after, check the photo at full size, and export it in the right format. If a photo needs more than five minutes, it probably needs a selective edit or a reshoot in better light.
Export, Share and Print: Finish the Photo Properly
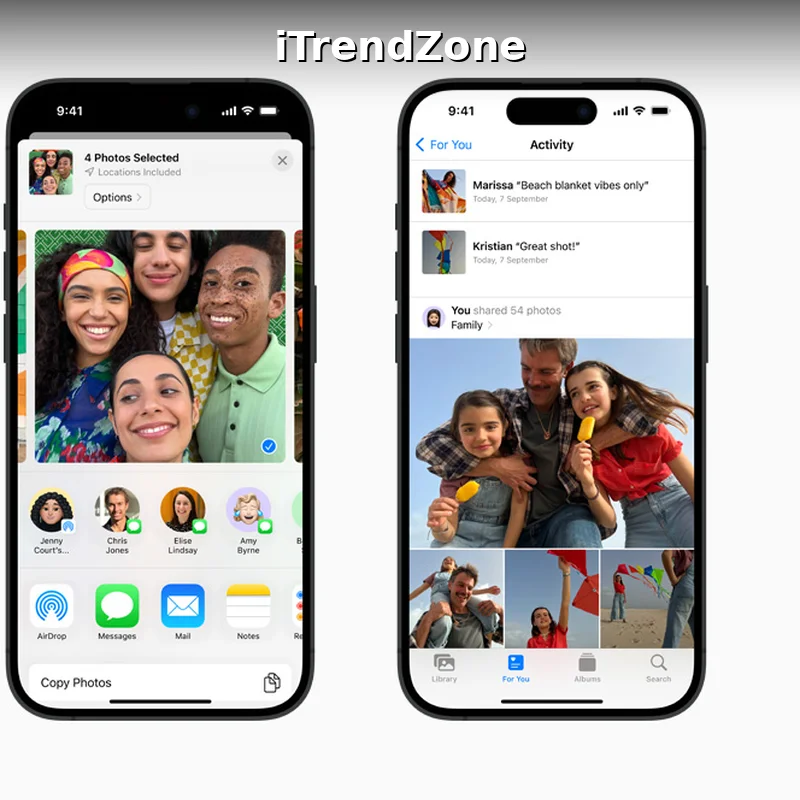
Editing is only half the job. When you share a photo from Photos, tap Options in the share sheet to choose the format and whether to include location data. For most sharing, JPEG is the safest format, because it opens on almost every device and website. HEIC is smaller and higher quality, but some recipients cannot open it. For printing, export at the highest quality and the largest size available, and avoid screenshots or heavily compressed copies, because they will look soft in print.
Troubleshooting Common iPhone Photo Editing Problems
Most editing problems have a simple cause. If your edited photo looks too dark after you share it, you may have edited it on a bright screen with Night Shift on, or the sharing app may have compressed it. Check the photo again in daylight and export a fresh copy. If it looks oversaturated, you probably pushed Vibrance or Saturation too far, or applied a strong filter on top of strong colour adjustments. Reduce both and compare before and after at full size.
If Clean Up leaves a blurry patch, undo and try a smaller selection, or crop the area out. If a Portrait photo looks cut out around the hair, reduce the depth effect. If a photo looks soft after a heavy crop, you may have cropped beyond what the resolution can support. If Photos feels slow, free up storage and restart your iPhone. Our guide to fixing iPhone camera problems covers camera issues that affect the photos you edit, and our guide to iPhone Camera Control button explains the hardware controls on iPhone 16 and iPhone 17.
Frequently Asked Questions About iPhone Photo Editing
Can I Edit Photos on iPhone Without a Paid App?
Yes. The Photos app on iOS 26 is free and included with every iPhone, and it covers Auto Enhance, crop, straighten, filters, Photographic Styles, Clean Up, Portrait controls, and all the Adjust sliders in this guide. For most people, that is enough for everyday editing. A paid app is only worth it if you need selective masks, curves, or advanced AI retouching every day. Try the built-in tools first, learn them properly, and only pay when you can name the specific job it will do better.
Will Editing a Photo Change the Original?
No, editing in Photos will not change the original, because the app uses non-destructive editing. Your changes are saved as instructions, and you can revert to the original at any time by opening the photo in Edit and tapping Revert. This is true for crop, light, colour, filters, and Clean Up edits made inside Photos. Some third-party apps save a new flattened copy instead, so check whether an app offers a revert option before you edit an important photo there. To be extra safe, duplicate a photo before a bold edit.
What Is the Best First Edit for a Dark Photo?
The best first edit for a dark photo is to lift Shadows a little, then add a small amount of Brilliance, and then increase Exposure if the photo looks too dark. Lifting Shadows reveals detail in dark areas without blowing out bright areas, Brilliance restores contrast in the mid-tones, and Exposure brightens everything at once. If the photo was taken in Night mode, be gentle with all three, because noise becomes visible in dark areas. A slightly dark photo with a clear subject is better than a bright photo full of grain.
Should I Use a Filter or Edit Manually?
Use manual editing when a photo needs a correction, such as brighter shadows or a straighter horizon, and use a filter when a photo needs a mood, such as a warm sunset look. The best results often combine both: fix light and colour manually first, then apply a filter at reduced strength to unify the look. Avoid stacking a strong filter on top of strong saturation and contrast. If you like a consistent look, choose one Photographic Style for a whole shoot, rather than a different filter for every photo.
How Do I Make My Edited Photos Look Natural?
To make edited photos look natural, edit in small steps, compare before and after often, and stop when the photo looks like a slightly better version of the original. Check skin tones first, because faces show colour problems most clearly, then check skies and foliage, because those show oversaturation most clearly. Edit in good light, check your work again in daylight, and view the photo at the size it will be seen. If you cannot explain why a change helps, undo it.
Your Next Steps: Edit One Photo Today
You now have a complete map of iPhone photo editing on iOS 26, from Auto Enhance and crop to Brilliance, Highlights, Clean Up, Photographic Styles, ProRAW, and third-party apps. The next step is not to learn every tool at once, but to edit one photo today using the five-minute workflow in this guide. Crop and straighten it, fix the light, fix the colour, add a touch of sharpness, and compare before and after. Save that version, share it with someone you trust, and ask whether it looks natural.
Keep practising with the same workflow, and your editing will become faster and more confident. Try one new tool each week, such as Clean Up, Portrait Lighting, or copying edits to a batch, and keep a note of which settings work best for your favourite subjects. For more on the camera itself, return to our pillar guide at iPhone Camera complete guide, and for voice-controlled workflows, read our guide to iPhone Siri Shortcuts voice commands. Apple offers a technical view in its PhotoKit documentation, and an overview of the latest hardware on its iPhone 17 pages.
References
- Apple Support: Edit Photos on iPhone
- Apple Support: Live Photos on iPhone
- Apple Support: iCloud Photos
- Apple iPhone
- Apple iPhone 17
- Apple Developer: PhotoKit Documentation
Quiz: Test Your iPhone Photo Editing Knowledge
Question 1: What should you do first when you start editing a photo in the Photos app?
A) Apply a strong filter at full strength
B) Increase Saturation to maximum
C) Crop and straighten the photo before adjusting light and colour
D) Delete the original to save storage
Question 2: Which slider brightens dark areas and adds contrast to mid-tones without blowing out bright skies?
A) Brilliance
B) Black Point
C) Tint
D) Vignette
Question 3: What does non-destructive editing in the Photos app mean?
A) Your original is never overwritten and you can revert your edits at any time
B) Your edits are permanent and cannot be undone
C) Your photo is automatically deleted after editing
D) Your photo can only be edited once
Question 4: When does Clean Up work best?
A) On large objects that overlap the main subject
B) On complex patterns with no clear background
C) On small distractions against a simple background
D) On a photo you have already flattened in another app
Question 5: Which format is the safest choice for sharing a photo so that almost any device can open it?
A) ProRAW only
B) JPEG
C) A Live Photo file on its own
D) A screenshot of the edited photo
Quiz Answers
Question 1: C — Crop and straighten the photo before adjusting light and colour. Question 2: A — Brilliance. Question 3: A — Your original is never overwritten and you can revert your edits at any time. Question 4: C — On small distractions against a simple background. Question 5: B — JPEG.